> ## Documentation Index
> Fetch the complete documentation index at: https://docs.vervecopilot.com/llms.txt
> Use this file to discover all available pages before exploring further.
# Custom response style
> Create personalized AI response styles with custom prompts and variables to match your interview needs
## Overview
Custom Response Style lets you customize exactly how your AI Interview Copilot generates responses by modifying the system and user prompts that power the AI. This advanced feature gives you complete control over the AI's behavior, tone, structure, and focus—allowing you to tailor responses to your specific interview style and needs.
**How to access:** Click the **settings gear icon** on the [copilot launch page](https://www.app.vervecopilot.com/copilot), then select the **Response Style** tab. This can also be accessed on [Playground](https://www.app.vervecopilot.com/playground) → **Custom Styles** tab.
Test your custom styles in the [Playground](https://www.app.vervecopilot.com/playground) before using them in live interviews to ensure they generate the responses you expect.
***
## How to Create a Custom Response Style
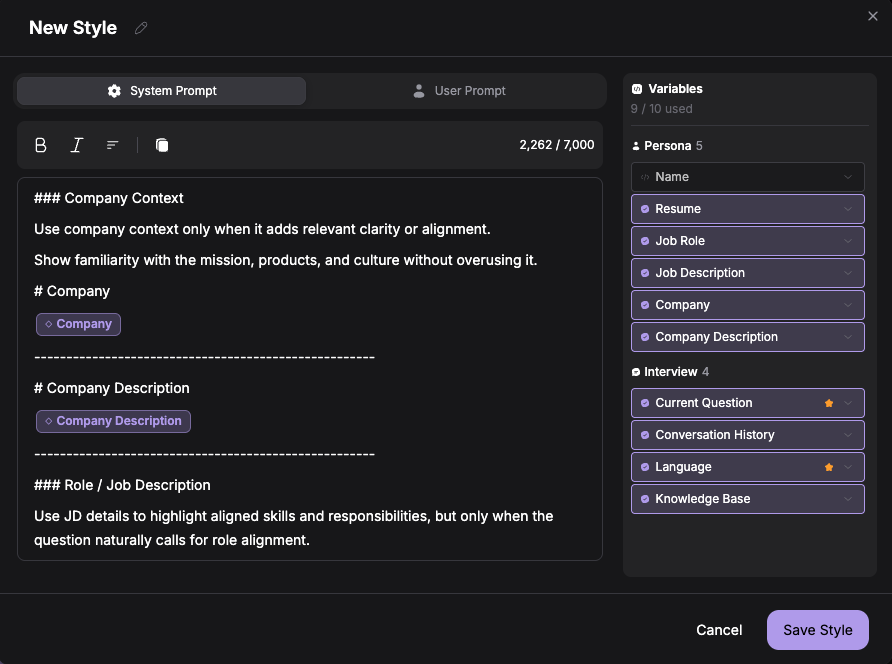
Go to the [copilot launch page](https://www.app.vervecopilot.com/copilot) and click the **settings gear icon**. Select the **Response Style** tab.
Click **Create New Style** to start building a custom response configuration.
Give your style a descriptive name (e.g., "Technical Interview - Concise", "Behavioral STAR Format", "System Design Deep Dive").
Modify the system prompt to define how the AI should behave. This controls the AI's role, tone, and general instructions.
**Example:** "You are a technical interview assistant. Provide concise, code-focused answers with minimal explanation. Always include time/space complexity analysis."
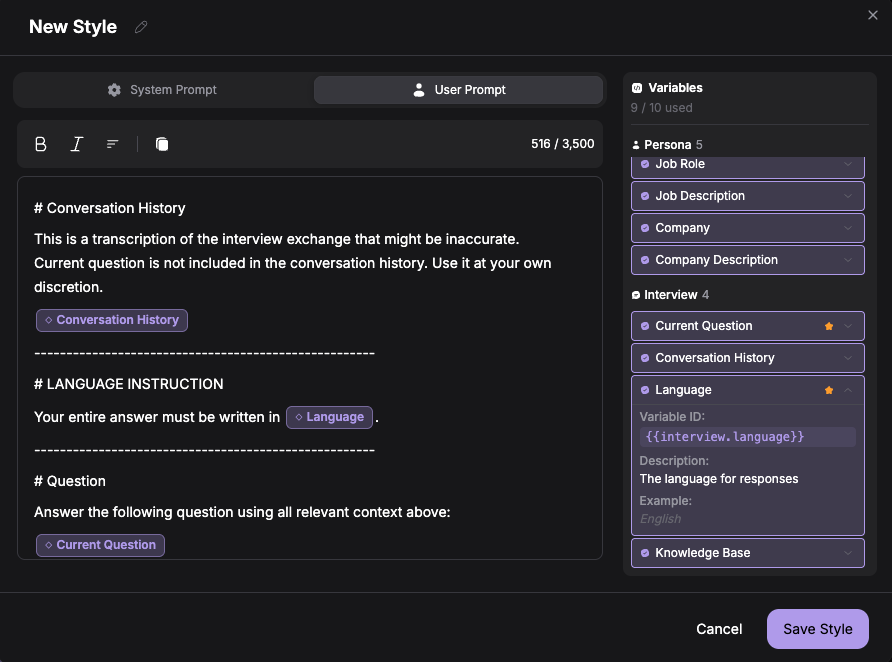
Define how user input is formatted when sent to the AI. Insert variables using double curly braces like `{{variableName}}`.
**Example:** Question: `{{interview.question}}` with Candidate Background: `{{interview.question}}` and Target Role: `{{interview.question}}`
Once complete, click **Save** to add your custom style to your library. It will now appear in your style selection dropdown.
***
## How to Manage Custom Styles
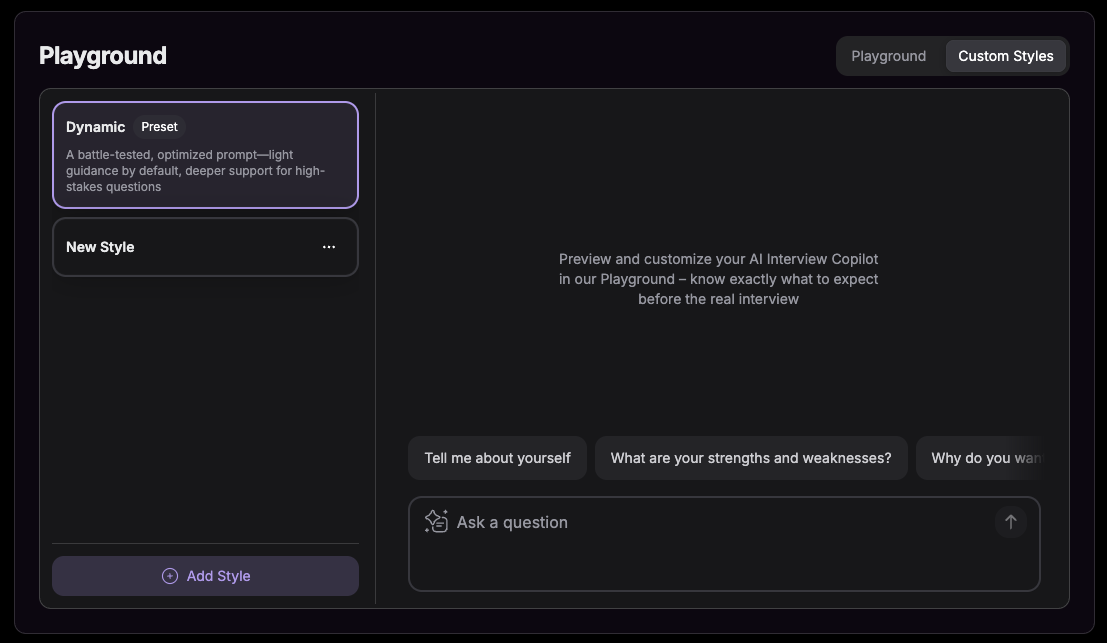
The [Playground](https://www.app.vervecopilot.com/playground) is your central hub for testing, managing, and refining custom response styles before using them in real interviews.
### Test Your Custom Styles
Navigate to [Playground](https://www.app.vervecopilot.com/playground) from your dashboard.
In the left panel, find and select the custom style you want to test from the dropdown menu.
Type interview questions in the right-side chat box to see how your custom style generates responses.
Review the AI's answers to ensure they match your expectations in terms of tone, structure, and content.
Return to settings to adjust your prompts based on test results, then re-test until responses feel perfect.
Use the Custom Styles tab in Playground to make prompt engineering faster and more intuitive without switching between multiple pages.
***
## Available Variables
When creating custom prompts, you can insert dynamic variables that automatically populate with your personal information. This makes responses more contextual and relevant to your specific interview.
### Persona Variables
These variables pull from your active interview profile:
| Variable | Description | Example Use Case |
| -------------------------------- | ---------------------------- | ------------------------------------------------ |
| `{{persona.name}}` | Your full name | Personalizing response introductions |
| `{{persona.resume}}` | Your uploaded resume content | Tailoring answers to your experience |
| `{{persona.jobRole}}` | Target position title | Focusing responses on role-specific skills |
| `{{persona.jobDescription}}` | Full job posting details | Aligning answers with company requirements |
| `{{persona.company}}` | Company name | Customizing responses for specific organizations |
| `{{persona.companyDescription}}` | Company background info | Demonstrating knowledge of the company |
### Interview Variables
These variables are dynamically updated during your interview session:
| Variable | Description | Example Use Case |
| ----------------------------------- | ------------------------------ | -------------------------------------------------- |
| `{{interview.question}}` | The question being asked | Ensuring responses directly address the question |
| `{{interview.conversationHistory}}` | Previous questions and answers | Maintaining context across the interview |
| `{{interview.language}}` | Interview language setting | Ensuring responses match the interview language |
| `{{interview.knowledgeBase}}` | Uploaded support documents | Incorporating cheat sheets and reference materials |
***
## Troubleshooting
Ensure you're using the exact variable names with correct spelling: `{{persona.name}}`, `{{persona.resume}}`, `{{interview.question}}`, etc. Variables use camelCase formatting.
Make your system prompt more specific and directive. Use clear language like "Always include..." or "Never mention..." instead of suggestions like "Try to..." or "Consider...".
Ensure you've selected the correct custom style before launching your interview session. Check the Response Style dropdown in copilot settings before clicking "Start Interview."
After creating a style in settings, refresh the page or navigate back to the [Copilot Launch Page](https://www.app.vervecopilot.com/copilot). If it still doesn't appear, check that you clicked "Save" after creating the style.
***
## Frequently Asked Questions
Yes! Custom Response Styles work with all 21 AI models available in Verve AI. Test different combinations in Playground to find your ideal pairing.
Yes, your custom styles are tied to your account and will be available on Desktop App, Browser, and Mobile platforms.
There is no hard limit on the number of custom styles you can create. Build as many as you need for different interview types.
Currently, custom styles are personal to your account and cannot be shared. However, you can manually share your prompt text with others to recreate your style.
You cannot delete the default system style—it will always be available as a fallback option. You can only delete custom styles you've created.
Custom styles themselves don't impact response speed, but longer or more complex prompts may slightly increase processing time. AI model selection has a bigger impact on speed than prompt customization.